
If a video file plays normally on your computer before upload but produces a playback error when you try to play it in Mediasite, either in Mediasite content placed in a course or in the Mediasite management screen (My Mediasite), or if nothing plays and only a black screen is displayed, the video's format, codec, or another characteristic may not be supported by Mediasite.
Even if there is no problem with the video file itself, videos may temporarily fail to play when the number of simultaneous viewers exceeds the limit in Science Tokyo's Mediasite contract. In this case, ask students to wait a while and then access the video again. If playback errors caused by the simultaneous viewer limit occur frequently, also consider using Box, YouTube, or similar services.
Playback errors caused by the video file's format, codec, or another characteristic may be avoided in the following two ways.
Edit videos in Mediasite after upload rather than editing them before upload
Most video files that cause a Mediasite playback error have been edited in video-editing software before upload. It is assumed that the software creates a file that is not fully compatible with Mediasite.
(Conversely, playback errors are rare when files created with Zoom recording or PowerPoint's video-creation feature are uploaded to Mediasite without editing.)
For edits no more advanced than trimming the beginning, end, or middle, you can use Mediasite's "Edit Video" feature after upload.
Performing minor editing in Mediasite and avoiding editing before upload can substantially reduce the likelihood of playback errors after upload.
Re-encode videos that cause playback errors, then upload them again
If a video plays on your computer but causes a playback error in Mediasite, the issue can usually be resolved by properly re-encoding the file and uploading it again.
Mediasite recommends the following format and codecs:
■ File format: "MP4"
■ Video codec: "H.264/AVC"
■ Audio codec: "AAC"
Microsoft Clipchamp, included with Windows 11, does not allow detailed configuration, and parts of its video-conversion process are opaque. It has been observed that even with the same output settings, compression may vary by computer; that Clipchamp conversion may fail to resolve a Mediasite playback error even when the format and codec are as specified above; and that Clipchamp conversion may itself create files that cause Mediasite playback errors. Accordingly, using Clipchamp to edit videos for upload to Mediasite is relatively not recommended.
For reference, the following example describes how to re-encode a file using Adobe Media Encoder, which is available at Science Tokyo.
However, this support site does not recommend the use of tools that are not directly related to LMS/MORE. This example is provided only as a reference; it does not guarantee the software's operation or provide detailed guidance on how to use it.
For information about using Adobe products at Science Tokyo, see the guidance issued separately by the responsible department.
Media Encoder can be installed through Adobe Creative Cloud.

Start Media Encoder, click the "+" below "Queue" at the top right of the screen, and select the video file.

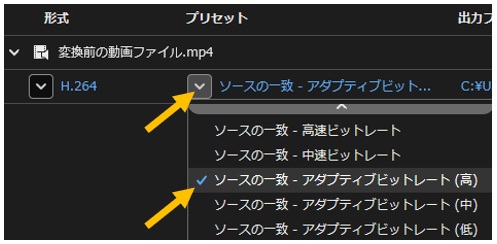
Confirm that "Format" is set to "H.264", then click the down-arrow under "Preset" and select "Match Source - Adaptive High Bitrate".
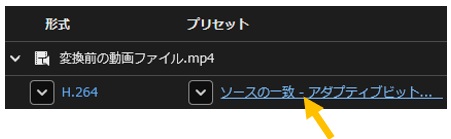
Click the "Match Source - Adaptive Bitrate" text to the right of the down-arrow you used.
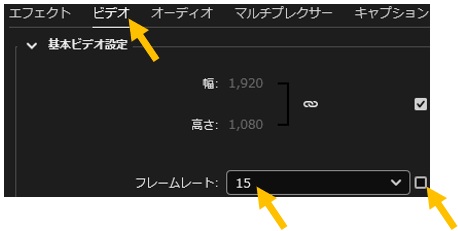
In the window that opens, click the "Video" tab. Scroll down in the display area below, clear the box to the right of "Frame Rate", and change the setting to "15".
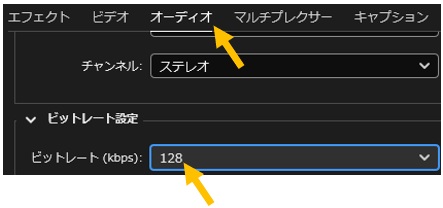
Click the "Audio" tab. Scroll down in the display area below and change "Bitrate (kbps)" to "128".
Click "OK" at the bottom right of the window.
The window closes. If the preset changes to "Custom", the adjusted settings have been applied.
Click the text below "Output File" and change the output filename and destination folder as needed.

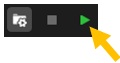
Click the right-pointing triangle at the top right of the screen to generate the re-encoded file.
The frame-rate and bitrate adjustments above also help prevent unnecessary increases in file size.
See the following guidance as appropriate.
https://isct-edu.tayori.com/q/lms-en/detail/1343732/